Transporters: Difference between revisions
geometrydash.wiki.gg>DrawASeashell2 m tidying |
Rexster930 (talk | contribs) mNo edit summary |
||
| (22 intermediate revisions by 4 users not shown) | |||
| Line 1: | Line 1: | ||
'''Transporters''' are special [[objects]] in [[Geometry Dash]] levels that the icon can interact with to travel a certain distance and in a certain direction, depending on the type. | |||
'''Transporters''' are special [[objects]] in [[Geometry Dash]] levels that the icon can interact with | |||
There are two types of transporters | There are two types of transporters: '''pads''' and '''orbs''', both of which can manipulate travel direction. They emit identical-coloured particle effects. When used, pads also emit an identically coloured expanding circle effect (except the red pad), and orbs emit an identically coloured contracting circle effect. | ||
Pads always activate when | Pads always activate when they contact the icon, while orbs require a click/tap to trigger any effect and are thus optional. They may be positioned to redirect the icon into a hazard, which must be avoided in such cases. | ||
As of [[Update 1.6]], some transporters | As of [[Update 1.6]], some transporters were introduced as part of collecting [[Collectibles|secret coins]] ''prior'' to their formal introduction. These include the yellow, blue and pink pads as well as the pink orb. | ||
Transporters are available under the seventh tab in the [[Level Editor|level editor]], along with [[portals]] and other components. | Transporters are available under the seventh tab in the [[Level Editor|level editor]], along with [[portals]] and other components. | ||
==Types== | ==Types== | ||
<div class="expanded-wide-table" style="display:block;width:100%;max-width:100%;min-width:0;overflow-x:auto;box-sizing:border-box;"> | |||
{| class="wikitable" | {| class="wikitable" | ||
|+Pads | |+Pads | ||
| Line 49: | Line 49: | ||
|2.85 (1.66) | |2.85 (1.66) | ||
|2 (2.5166) | |2 (2.5166) | ||
| - | | - | ||
|4.533 (3.6166) | |4.533 (3.6166) | ||
|2.75 (1.6166) | |2.75 (1.6166) | ||
| Line 61: | Line 61: | ||
*[[Update 1.6]]: [[Can't Let Go]] (3<sup>rd</sup> coin) | *[[Update 1.6]]: [[Can't Let Go]] (3<sup>rd</sup> coin) | ||
|[[Update 2.1|Update 2.12]]: Theory of Everything | |[[Update 2.1|Update 2.12]]: Theory of Everything | ||
| - | | - | ||
|Initial Release: [[Toxic Factory|Monster Dance Off]] | |Initial Release: [[Toxic Factory|Monster Dance Off]] | ||
|Initial Release: [[Press Start]] | |Initial Release: [[Press Start]] | ||
| Line 69: | Line 69: | ||
|1.2833 (1.8166) | |1.2833 (1.8166) | ||
|1.2 (0.65) | |1.2 (0.65) | ||
| - | | - | ||
|2.1366 (1.3) | |2.1366 (1.3) | ||
|1.1833 (0.75) | |1.1833 (0.75) | ||
| Line 78: | Line 78: | ||
|[[File:RedPadPreview.gif|250px]] | |[[File:RedPadPreview.gif|250px]] | ||
|[[Update 2.1]]: [[Fingerdash]] | |[[Update 2.1]]: [[Fingerdash]] | ||
| - | | - | ||
| - | | - | ||
|Initial Release:<ref name=":0">From [[User Levels|user levels]]</ref> | |Initial Release:<ref name=":0">From [[User Levels|user levels]]</ref> | ||
| Line 87: | Line 87: | ||
|4.533 (2.9) | |4.533 (2.9) | ||
|2.95 (1.466) | |2.95 (1.466) | ||
| - | | - | ||
|7.433 (4.533) | |7.433 (4.533) | ||
|4.533 (2.833) | |4.533 (2.833) | ||
| Line 96: | Line 96: | ||
|[[File:BlueMiaFreyaPadPreview.gif|250px]] | |[[File:BlueMiaFreyaPadPreview.gif|250px]] | ||
| | | | ||
*[[Update 1.3]]: | *[[Update 1.3]]: [[xStep]] | ||
*[[Update 1.6]]: [[Back On Track]] ( | *[[Update 1.6]]: [[Back On Track]] (1<sup>st</sup> coin) | ||
| [[Update 2.1|Update 2.10]]: [[xStep]] | |[[Update 2.1|Update 2.10]]: [[xStep]] | ||
| - | | - | ||
|Initial Release: [[Toxic Factory|Round 1]] | |Initial Release: [[Toxic Factory|Round 1]] | ||
|Initial Release: [[Press Start]] | |Initial Release: [[Press Start]] | ||
| colspan="9" |Inverts gravity | | colspan="9" |Inverts gravity | ||
|- | |- | ||
|Spider | |Spider | ||
|[[File:TeleportationPad.png|100px]] | |[[File:TeleportationPad.png|100px]] | ||
|[[File:SpiderPurplePadPreview.gif|250px]] | |[[File:SpiderPurplePadPreview.gif|250px]] | ||
| | | | ||
*[[Update 2.2]]<ref name=":0" /> | *[[Update 2.2]]<ref name=":0" /> | ||
| - | | - | ||
| - | | - | ||
| - | | - | ||
| - | | - | ||
| colspan="9" |Mimics the behavior of the [[Portals|Spider form]]. Teleports the | | colspan="9" |Mimics the behavior of the [[Portals|Spider form]]. Teleports the icon to the nearest surface in the appropriate direction, inverting gravity if necessary. | ||
|} | |} | ||
</div> | |||
<div class="expanded-wide-table" style="display:block;width:100%;max-width:100%;min-width:0;overflow-x:auto;box-sizing:border-box;"> | |||
{| class="wikitable" | {| class="wikitable" | ||
|+Orbs | |+Orbs | ||
| Line 131: | Line 133: | ||
!Cube | !Cube | ||
!Ship | !Ship | ||
! Ball | !Ball | ||
! UFO | !UFO | ||
!Wave | !Wave | ||
! Robot | !Robot | ||
!Spider | !Spider | ||
!Swing | !Swing | ||
| Line 141: | Line 143: | ||
| colspan="2" style="text-align:center;" |[[File:YellowJumpRing.png|100x100px]] | | colspan="2" style="text-align:center;" |[[File:YellowJumpRing.png|100x100px]] | ||
|[[File:YellowOrbPreview.gif|250px]] | |[[File:YellowOrbPreview.gif|250px]] | ||
|Initial Release: [[Polargeist]] | |Initial Release: [[Polargeist]] | ||
|[[Update 1.3]]: Polargeist | |[[Update 1.3]]: Polargeist | ||
|Initial Release: [[Airborne Robots]] | |Initial Release: [[Airborne Robots]] | ||
|Initial Release: [[Dashlands|Machina]] | |Initial Release: [[Dashlands|Machina]] | ||
|Initial Release: [[Press Start]] | |Initial Release: [[Press Start]] | ||
|Launches the | |Launches the icon at a medium height | ||
|2.3833 (1.35) (roughly identical to a jump) | |2.3833 (1.35) (roughly identical to a jump) | ||
|2.85 (3.5) | |2.85 (3.5) | ||
| 1.733 (1.1) | |1.733 (1.1) | ||
|2.1 (2.2) | |2.1 (2.2) | ||
| - | | - | ||
|2.1 (1.2166) | |2.1 (1.2166) | ||
| 1.633 (1.05) | |1.633 (1.05) | ||
|1.95 | |1.95 | ||
(0.91) | (0.91) | ||
| Line 163: | Line 165: | ||
*[[Update 1.6]]: [[Time Machine]] (3<sup>rd</sup> coin) | *[[Update 1.6]]: [[Time Machine]] (3<sup>rd</sup> coin) | ||
|[[Update 2.1|Update 2.12]]: Theory of Everything | |[[Update 2.1|Update 2.12]]: Theory of Everything | ||
| - | | - | ||
|Initial Release: [[The Challenge]] | |Initial Release: [[The Challenge]] | ||
|Initial Release: [[Press Start]] | |Initial Release: [[Press Start]] | ||
|Launches the | |Launches the icon at a small height | ||
|1.0833 (0.6833) | |1.0833 (0.6833) | ||
|0.9 (0.566) | |0.9 (0.566) | ||
|1.0166 (0.65) | |1.0166 (0.65) | ||
|0.66 (0.366) | |0.66 (0.366) | ||
| - | | - | ||
|1.2166 (0.766) | |1.2166 (0.766) | ||
|0.7833 (0.5) | |0.7833 (0.5) | ||
| Line 178: | Line 180: | ||
|- | |- | ||
|[[File:RedJumpRing.png|100px]] | |[[File:RedJumpRing.png|100px]] | ||
|[[File:RedJumpRingLabelled.png|100x100px]] | |||
|[[File:RedJumpRingLabelled.png|100x100px]] | |[[File:RedOrbPreview.gif|250px]] | ||
|[[File:RedOrbPreview.gif|250px]] | |[[Update 2.1]]: [[Fingerdash]] | ||
|[[Update 2.1]]: [[Fingerdash]] | | - | ||
| - | | - | ||
| - | |||
|Initial Release<ref name=":0" /> | |Initial Release<ref name=":0" /> | ||
|N/A | |N/A | ||
|Launches the | |Launches the icon at a large height | ||
| 4.533 (2.866) | |4.533 (2.866) | ||
| 4.533 (3.5) | |4.533 (3.5) | ||
|3.66 (2.266) | |3.66 (2.266) | ||
|4.3 (2.3166) | |4.3 (2.3166) | ||
| - | | - | ||
| 4.433 (2.75) | |4.433 (2.75) | ||
| 3.566 (2.133) | |3.566 (2.133) | ||
|3.62 | |3.62 | ||
(1.55) | (1.55) | ||
| Line 200: | Line 200: | ||
| rowspan="2" |Gravity | | rowspan="2" |Gravity | ||
|[[File:CyanGravityRing.png|100px]] | |[[File:CyanGravityRing.png|100px]] | ||
|[[File:CyanGravityRingLabelled.png|100x100px]] | |||
|[[File:CyanGravityRingLabelled.png|100x100px]] | |[[File:BlueMiaFreyaOrbPreview.gif|250px]] | ||
|[[File:BlueMiaFreyaOrbPreview.gif|250px]] | | | ||
| | |||
*[[Update 1.3]]: [[xStep]] | *[[Update 1.3]]: [[xStep]] | ||
**[[Update 1.6]]: 3<sup>rd</sup> coin | **[[Update 1.6]]: 3<sup>rd</sup> coin | ||
|[[Update 2.1|Update 2.10]]: xStep | |[[Update 2.1|Update 2.10]]: xStep | ||
| - | | - | ||
|Initial Release: [[Toxic Factory|Round 1]] | |Initial Release: [[Toxic Factory|Round 1]] | ||
|Initial Release: [[Press Start]] | |Initial Release: [[Press Start]] | ||
| colspan="9" |Inverts the | | colspan="9" |Inverts the icon's gravity and abruptly forces it toward the opposite gravity it had before hitting the ring. | ||
|- | |||
|- | |||
|[[File:GreenGravityRing.png|100px]] | |[[File:GreenGravityRing.png|100px]] | ||
|[[File:GreenGravityRingLabelled.png|100x100px]] | |||
|[[File:GreenGravityRingLabelled.png|100x100px]] | |[[File:GreenMiaFreyaOrbPreview.gif|250px]] | ||
|[[File:GreenMiaFreyaOrbPreview.gif|250px]] | |[[Update 2.0]]: [[Deadlocked]] | ||
|[[Update 2.0]]: [[Deadlocked]] | | - | ||
| - | | - | ||
|Initial Release: [[The Challenge]] | |Initial Release: [[The Challenge]] | ||
|Initial Release: [[Nock Em]] | |Initial Release: [[Nock Em]] | ||
| colspan="1" |Inverts the gravity of the | | colspan="1" |Inverts the gravity of the icon and launches it towards the new direction. The launch height depends on the vertical velocity at impact with the orb and averages slightly lower than the yellow orb. | ||
|1.9583 (1.2125) | |1.9583 (1.2125) | ||
|≦2.03 (≦1.1167) | |≦2.03 (≦1.1167) | ||
|<!--1.733 (1.1)-->TBA | |<!--1.733 (1.1)-->TBA | ||
|<!--2.1 (2.2)-->TBA | |<!--2.1 (2.2)-->TBA | ||
|<!--2.1 (1.2166)-->TBA | |||
|<!--1.633 (1.05)-->TBA | |<!--1.633 (1.05)-->TBA | ||
| | | | ||
| | | | ||
|- | |||
|- | |Drop | ||
|Drop | |[[File:BlackGravityRing.png|100px]] | ||
|[[File:BlackGravityRing.png|100px]] | |[[File:BlackGravityRingLabelled.png|100x100px]] | ||
|[[File:BlackOrbPreview.gif|250px]] | |||
|[[File:BlackGravityRingLabelled.png|100x100px]] | |[[Update 2.1]]: [[Fingerdash]] | ||
|[[File:BlackOrbPreview.gif|250px]] | | - | ||
|[[Update 2.1]]: [[Fingerdash]] | | - | ||
| - | |Initial Release¹ | ||
| - | | - | ||
|Initial Release¹ | | colspan="9" |Forces the icon downwards. | ||
| - | |- | ||
| colspan="9" |Forces the | |||
|- | |||
| rowspan="2" | Dash | | rowspan="2" | Dash | ||
| colspan="2" style="text-align:center;" |[[File:GreenDashRing.png|100px]] | | colspan="2" style="text-align:center;" |[[File:GreenDashRing.png|100px]] | ||
|[[File:GreenDashOrbPreview.gif|250px]] | |[[File:GreenDashOrbPreview.gif|250px]] | ||
|[[Update 2.1]]: [[Fingerdash]] | |[[Update 2.1]]: [[Fingerdash]] | ||
| - | | - | ||
| - | | - | ||
|Initial Release: [[The Challenge]] | |Initial Release: [[The Challenge]] | ||
| - | | - | ||
| colspan="9" |Suspends the player in linear motion. | | colspan="9" |Suspends the player in linear motion. | ||
|- | |- | ||
| Line 260: | Line 254: | ||
|[[Update 2.1]]: [[Fingerdash]] | |[[Update 2.1]]: [[Fingerdash]] | ||
| - | | - | ||
| - | |||
| - | |||
|Initial Release: [[The Challenge]] | |Initial Release: [[The Challenge]] | ||
| - | | - | ||
| colspan="9" |Suspends the | | colspan="9" |Suspends the icon in linear motion (similar to the green dash orb) and additionally inverts the gravity once hit. | ||
|- | |- | ||
|Custom | |Custom | ||
| colspan="2" style="text-align:center;" |[[File:ToggleRing.png|100px]] | | colspan="2" style="text-align:center;" |[[File:ToggleRing.png|100px]] | ||
|[[File:CustomOrbPreview.gif| | |<span class="expanded-original-gif" style="display:inline-block;width:250px;height:140.625px;overflow:hidden;vertical-align:middle;"><span style="display:block;width:800px;height:450px;transform:scale(0.3125);transform-origin:0 0;">[[File:CustomOrbPreview.gif|800px]]</span></span> | ||
|[[Update 2.1]]: <ref name=":0" /> | |[[Update 2.1]]: <ref name=":0" /> | ||
| - | | - | ||
| - | |||
| - | |||
|Initial Release<ref name=":0" /> | |Initial Release<ref name=":0" /> | ||
| Update 2.21.3: | | Update 2.21.3: | ||
[[Power Trip]] (2nd coin) | [[Power Trip]] (2nd coin) | ||
| colspan="9" |Acts as a customizable toggle for user levels that activates a trigger upon hit by the | | colspan="9" |Acts as a customizable toggle for user levels that activates a trigger upon being hit by the icon. | ||
|- | |- | ||
|Spider | |Spider | ||
| colspan="2" style="text-align:center;" |[[File:TeleportationRing.png|100px]] | | colspan="2" style="text-align:center;" |[[File:TeleportationRing.png|100px]] | ||
|[[File:SpiderPurpleOrbPreview.gif| | |<span class="expanded-original-gif" style="display:inline-block;width:250px;height:140.625px;overflow:hidden;vertical-align:middle;"><span style="display:block;width:800px;height:450px;transform:scale(0.3125);transform-origin:0 0;">[[File:SpiderPurpleOrbPreview.gif|800px]]</span></span> | ||
|[[Update 2.2]]: [[Dash]] | |[[Update 2.2]]: [[Dash]] | ||
| - | | - | ||
| - | | - | ||
|Initial Release¹ | |Initial Release¹ | ||
| - | | - | ||
| colspan="9" |Mimics the behavior of the [[Portals|Spider form]]. Teleports the | | colspan="9" |Mimics the behavior of the [[Portals|Spider form]]. Teleports the icon to the nearest surface in the appropriate direction, inverting gravity if necessary. | ||
|- | |- | ||
|Teleport | |Teleport | ||
| colspan="2" style="text-align:center;" |[[File:LinkedTeleportationRing.png|100px]] | | colspan="2" style="text-align:center;" |[[File:LinkedTeleportationRing.png|100px]] | ||
|[[File:TelepOrbPreview.gif|250px]] | |[[File:TelepOrbPreview.gif|250px]] | ||
|[[Update 2.2]]<ref name=":0" /> | |[[Update 2.2]]<ref name=":0" /> | ||
| | | | ||
| | | | ||
| - | | - | ||
| - | | - | ||
| colspan="9" |Teleports the | | colspan="9" |Teleports the icon to an object in a target group, chosen at random if more than one exists. | ||
|} | |} | ||
</div> | |||
;Notes | ;Notes | ||
<references /> | <references /> | ||
==Trivia== | ==Trivia== | ||
*In non-Platformer levels, a dash orb can be rotated to direct the icon in an angled direction up to ±70°, with horizontal velocity remaining unchanged. Horizontally flipping or using a rotate trigger on a dash orb | *In non-Platformer levels, a dash orb can be rotated to direct the icon in an angled direction up to ±70°, with horizontal velocity remaining unchanged. Horizontally flipping or using a rotate trigger on a dash orb to point it backwards or in another direction only changes its visual appearance, not its functional axis. | ||
*Interacting with any | *Interacting with any orb counts as a jump regardless of whether the player's form can jump. It includes orbs that launch the icon in the direction of gravity or do not affect its movement, including custom orbs. | ||
*The custom orb and the teleport orb are the only two orbs that are not dependent on a pulse [[Triggers|trigger]] or the paste | *The custom orb and the teleport orb are the only two orbs that are not dependent on a pulse [[Triggers|trigger]] or the paste colour function to have their colours changed. | ||
*The pink pad, despite launching the icon a smaller height, has a slightly larger size than the yellow pad. | *The pink pad, despite launching the icon at a smaller height, has a slightly larger size than the yellow pad. | ||
*The blue orb and the spider orb are the only non-jump orbs that have a pad equivalent. | *The blue orb and the spider orb are the only non-jump orbs that have a pad equivalent. | ||
**The custom orb's automatic equivalent is a (touch-activated) | **The custom orb's automatic equivalent is a (touch-activated) trigger on its own. | ||
**The green and drop orbs do not have corresponding pads because they force the player in the direction of gravity, thereby invalidating the purpose of a pad, which is to launch away from the ground, even if they would theoretically work while suspended in midair or on a surface not perpendicular to the direction of gravity. | **The green and drop orbs do not have corresponding pads because they force the player in the direction of gravity, thereby invalidating the purpose of a pad, which is to launch away from the ground, even if they would theoretically work while suspended in midair or on a surface not perpendicular to the direction of gravity. | ||
***No effect applies if the player hits the drop orb or theoretical pad if they have already landed. | ***No effect applies if the player hits the drop orb or theoretical pad if they have already landed. | ||
***These can be recreated in the level editor using combinations of multiple pads. | ***These can be recreated in the level editor using combinations of multiple pads. | ||
**The dash orbs do not have corresponding pads because their activation duration depends on the player's click/tap and hold. | **The dash orbs do not have corresponding pads because their activation duration depends on the player's click/tap and hold. | ||
**The teleport orb's automatic equivalent is the teleportation [[Portals|portal]] or, in rare cases, the teleport | **The teleport orb's automatic equivalent is the teleportation [[Portals|portal]] or, in rare cases, the teleport trigger. | ||
*The red pad is the largest of all jump pads, slightly clipping below its 1x1 grid unit. | *The red pad is the largest of all jump pads, slightly clipping below its 1x1 grid unit. | ||
*The effect of the dash orb can be sustained indefinitely until either crashing or coming into contact with an S-block. Entering a gravity portal applies its effect only after the dash orb's effect has ceased on release. | *The effect of the dash orb can be sustained indefinitely until either crashing or coming into contact with an S-block. Entering a gravity portal applies its effect only after the dash orb's effect has ceased on release. | ||
*Using a drop orb while not airborne will have no effect on the icon. | *Using a drop orb while not airborne will have no effect on the icon. | ||
*The player can crash from ceiling damage if they hit a green orb too low to the ground. | *The player can crash from ceiling damage if they hit a green orb too low to the ground. | ||
*Due to naturally unchanging momentum, the wave does not respond to jump pads or orbs while gravity pads and orbs flip gravity on contact without further effect on momentum. Dash orbs and spider pads/orbs work | *Due to naturally unchanging momentum, the wave does not respond to jump pads or orbs, while gravity pads and orbs flip gravity on contact without further effect on momentum. Dash orbs and spider pads/orbs work normally, as they override the icon's current momentum. | ||
**These jump pads and orbs still trigger their pulse animation, however. | **These jump pads and orbs still trigger their pulse animation, however. | ||
* | *Before [[Update 2.1]], the yellow jump orb emitted white particles instead of yellow. | ||
*The red pad displays the wrong particle colours when used: the red pad produces a yellow or pink circle when hit. | *The red pad displays the wrong particle colours when used: the red pad produces a yellow or pink circle when hit. | ||
*'Edit Special' with '''one non-custom''' orb selected will pop-up '''<nowiki>'Setup Object'</nowiki>''' menu. | *'Edit Special' with '''one non-custom''' orb selected will pop-up '''<nowiki>'Setup Object'</nowiki>''' menu. | ||
**Multi-activation allows the same jump orb to be activated multiple times. | **Multi-activation allows the same jump orb to be activated multiple times. It is mainly for reusing moving orbs. | ||
***Pads can also be multi- | ***Pads can also be multi-activated, but there is no 'Edit Special' for pads. | ||
*There are no differences in functionality between orbs on the ground and in midair, as demonstrated in [[Deadlocked]] and many user levels. | *There are no differences in functionality between orbs on the ground and in midair, as demonstrated in [[Deadlocked]] and many user levels. | ||
*Before 2.11, the drop orb made the ship and UFO go downward regardless of gravity. | *Before 2.11, the drop orb made the ship and UFO go downward regardless of gravity. It is a patched oversight. | ||
**When either touches a dash orb, it will not show any glow regardless | **When either touches a dash orb, it will not show any glow, regardless of whether the player has the glow effect on. | ||
*When the UFO or swing hits a drop orb, it has no terminal velocity until it lands on a surface or jumps again. | *When the UFO or swing hits a drop orb, it has no terminal velocity until it lands on a surface or jumps again. | ||
*When a player glides over | *When a player glides over an orb without activating it, it will show an expanding orb effect indicating its availability. | ||
**The same orb may play the effect multiple times if a setup allows the orb to be passed multiple times, as seen on one of the orbs in the first cube sequence of [[Cycles]]. | **The same orb may play the effect multiple times if a setup allows the orb to be passed multiple times, as seen on one of the orbs in the first cube sequence of [[Cycles]]. | ||
**In older versions, 2 orbs show instead of 1. The reason the second orb effect was removed is unknown. | **In older versions, 2 orbs show instead of 1. The reason the second orb effect was removed is unknown. | ||
*While the official name of the black- | *While the official name of the black-coloured orb is the 'Drop Orb' as per the Event Trigger's Select Event menu, the community usually calls it the black orb based on its colour and prior orbs officially being referred to by colour. | ||
**It is called a 'Drop Ring' in the game files. | **It is called a 'Drop Ring' in the game files. | ||
*While the official name of the square | *While the official name of the square recolourable orb is the 'Custom Orb' as per the Event Trigger's Select Event menu, the community usually calls it the toggle orb based on its default functionality being to toggle a group. | ||
*By jumping onto the top left side of a block under a blue pad, it is possible to clip through the block and be launched | *By jumping onto the top left side of a block under a blue pad, it is possible to clip through the block and be launched at a wonky angle. | ||
*Prior to [[Update 2.2]], the old official name of orbs was '''rings'''. | *Prior to [[Update 2.2]], the old official name of orbs was '''rings'''. It was likely changed because most players called them orbs. | ||
**The old name | **The old name still appears in the help text that shows after dying twice at the start of [[Polargeist]]. ('Click while touching a ring to jump mid air') | ||
*Teleporting with the spider pad or orb to a block scaled more than four blocks, with 'Extended collision' check enabled from the extras menu, the icon will ignore the block's hitbox. | *Teleporting with the spider pad or orb to a block scaled more than four blocks, with 'Extended collision' check enabled from the extras menu, the icon will ignore the block's hitbox. Without 'Extended collision', the icon sticks to the block's hitbox, 10 blocks from the centre. It also occurs on any platform or with hazards such as spikes or damage blocks. | ||
==Gallery== | ==Gallery== | ||
Latest revision as of 04:16, 14 October 2026
Transporters are special objects in Geometry Dash levels that the icon can interact with to travel a certain distance and in a certain direction, depending on the type.
There are two types of transporters: pads and orbs, both of which can manipulate travel direction. They emit identical-coloured particle effects. When used, pads also emit an identically coloured expanding circle effect (except the red pad), and orbs emit an identically coloured contracting circle effect.
Pads always activate when they contact the icon, while orbs require a click/tap to trigger any effect and are thus optional. They may be positioned to redirect the icon into a hazard, which must be avoided in such cases.
As of Update 1.6, some transporters were introduced as part of collecting secret coins prior to their formal introduction. These include the yellow, blue and pink pads as well as the pink orb.
Transporters are available under the seventh tab in the level editor, along with portals and other components.
Types
[edit | edit source]| Type | Transporter | Preview | First Introduced | Description | ||||||||||||
|---|---|---|---|---|---|---|---|---|---|---|---|---|---|---|---|---|
| Geometry Dash | GD Lite | GD Meltdown | GD World | GD SubZero | General | Cube | Ship | Ball | UFO | Wave | Robot | Spider | Swing | |||
| Jump | 
|

|
Initial Release: Back On Track | Update 1.2: Back On Track | Initial Release:
|
Initial Release: Beast Mode | Initial Release: Press Start | Launches the icon at a medium height | 4.533 (3.133) | 2.6166 (3.166) | 2.85 (1.66) | 2 (2.5166) | - | 4.533 (3.6166) | 2.75 (1.6166) | 2.85
(2.617) |

|

|
|
Update 2.12: Theory of Everything | - | Initial Release: Monster Dance Off | Initial Release: Press Start | Launches the icon at a small height | 1.933 (1.166) (Slightly less than a jump) | 1.166 (0.65) | 1.2833 (1.8166) | 1.2 (0.65) | - | 2.1366 (1.3) | 1.1833 (0.75) | 1.59
(0.70) | |

|

|
Update 2.1: Fingerdash | - | - | Initial Release:[1] | Initial Release: Press Start | Launches the icon at a large height | 6.533 (4.533) | 4.233 (2.2833) | 4.533 (2.9) | 2.95 (1.466) | - | 7.433 (4.533) | 4.533 (2.833) | 6.25 | |
| Gravity | 
|

|
|
Update 2.10: xStep | - | Initial Release: Round 1 | Initial Release: Press Start | Inverts gravity | ||||||||
| Spider | 
|

|
- | - | - | - | Mimics the behavior of the Spider form. Teleports the icon to the nearest surface in the appropriate direction, inverting gravity if necessary. | |||||||||
| Type | Transporter | Preview | First Introduced | Description | |||||||||||||
|---|---|---|---|---|---|---|---|---|---|---|---|---|---|---|---|---|---|
| Geometry Dash | GD Lite | GD Meltdown | GD World | GD SubZero | General | Cube | Ship | Ball | UFO | Wave | Robot | Spider | Swing | ||||
| Jump | 
|

|
Initial Release: Polargeist | Update 1.3: Polargeist | Initial Release: Airborne Robots | Initial Release: Machina | Initial Release: Press Start | Launches the icon at a medium height | 2.3833 (1.35) (roughly identical to a jump) | 2.85 (3.5) | 1.733 (1.1) | 2.1 (2.2) | - | 2.1 (1.2166) | 1.633 (1.05) | 1.95
(0.91) | |

|

|
|
Update 2.12: Theory of Everything | - | Initial Release: The Challenge | Initial Release: Press Start | Launches the icon at a small height | 1.0833 (0.6833) | 0.9 (0.566) | 1.0166 (0.65) | 0.66 (0.366) | - | 1.2166 (0.766) | 0.7833 (0.5) | 1
(0.42) | ||

|

|

|
Update 2.1: Fingerdash | - | - | Initial Release[1] | N/A | Launches the icon at a large height | 4.533 (2.866) | 4.533 (3.5) | 3.66 (2.266) | 4.3 (2.3166) | - | 4.433 (2.75) | 3.566 (2.133) | 3.62
(1.55) | |
| Gravity | 
|

|

|
|
Update 2.10: xStep | - | Initial Release: Round 1 | Initial Release: Press Start | Inverts the icon's gravity and abruptly forces it toward the opposite gravity it had before hitting the ring. | ||||||||

|

|

|
Update 2.0: Deadlocked | - | - | Initial Release: The Challenge | Initial Release: Nock Em | Inverts the gravity of the icon and launches it towards the new direction. The launch height depends on the vertical velocity at impact with the orb and averages slightly lower than the yellow orb. | 1.9583 (1.2125) | ≦2.03 (≦1.1167) | TBA | TBA | TBA | TBA | |||
| Drop | 
|

|

|
Update 2.1: Fingerdash | - | - | Initial Release¹ | - | Forces the icon downwards. | ||||||||
| Dash | 
|

|
Update 2.1: Fingerdash | - | - | Initial Release: The Challenge | - | Suspends the player in linear motion. | |||||||||

|

|
Update 2.1: Fingerdash | - | - | Initial Release: The Challenge | - | Suspends the icon in linear motion (similar to the green dash orb) and additionally inverts the gravity once hit. | ||||||||||
| Custom | 
|
Update 2.1: [1] | - | - | Initial Release[1] | Update 2.21.3:
Power Trip (2nd coin) |
Acts as a customizable toggle for user levels that activates a trigger upon being hit by the icon. | ||||||||||
| Spider | 
|
Update 2.2: Dash | - | - | Initial Release¹ | - | Mimics the behavior of the Spider form. Teleports the icon to the nearest surface in the appropriate direction, inverting gravity if necessary. | ||||||||||
| Teleport | 
|

|
Update 2.2[1] | - | - | Teleports the icon to an object in a target group, chosen at random if more than one exists. | |||||||||||


- Notes
Trivia
[edit | edit source]- In non-Platformer levels, a dash orb can be rotated to direct the icon in an angled direction up to ±70°, with horizontal velocity remaining unchanged. Horizontally flipping or using a rotate trigger on a dash orb to point it backwards or in another direction only changes its visual appearance, not its functional axis.
- Interacting with any orb counts as a jump regardless of whether the player's form can jump. It includes orbs that launch the icon in the direction of gravity or do not affect its movement, including custom orbs.
- The custom orb and the teleport orb are the only two orbs that are not dependent on a pulse trigger or the paste colour function to have their colours changed.
- The pink pad, despite launching the icon at a smaller height, has a slightly larger size than the yellow pad.
- The blue orb and the spider orb are the only non-jump orbs that have a pad equivalent.
- The custom orb's automatic equivalent is a (touch-activated) trigger on its own.
- The green and drop orbs do not have corresponding pads because they force the player in the direction of gravity, thereby invalidating the purpose of a pad, which is to launch away from the ground, even if they would theoretically work while suspended in midair or on a surface not perpendicular to the direction of gravity.
- No effect applies if the player hits the drop orb or theoretical pad if they have already landed.
- These can be recreated in the level editor using combinations of multiple pads.
- The dash orbs do not have corresponding pads because their activation duration depends on the player's click/tap and hold.
- The teleport orb's automatic equivalent is the teleportation portal or, in rare cases, the teleport trigger.
- The red pad is the largest of all jump pads, slightly clipping below its 1x1 grid unit.
- The effect of the dash orb can be sustained indefinitely until either crashing or coming into contact with an S-block. Entering a gravity portal applies its effect only after the dash orb's effect has ceased on release.
- Using a drop orb while not airborne will have no effect on the icon.
- The player can crash from ceiling damage if they hit a green orb too low to the ground.
- Due to naturally unchanging momentum, the wave does not respond to jump pads or orbs, while gravity pads and orbs flip gravity on contact without further effect on momentum. Dash orbs and spider pads/orbs work normally, as they override the icon's current momentum.
- These jump pads and orbs still trigger their pulse animation, however.
- Before Update 2.1, the yellow jump orb emitted white particles instead of yellow.
- The red pad displays the wrong particle colours when used: the red pad produces a yellow or pink circle when hit.
- 'Edit Special' with one non-custom orb selected will pop-up 'Setup Object' menu.
- Multi-activation allows the same jump orb to be activated multiple times. It is mainly for reusing moving orbs.
- Pads can also be multi-activated, but there is no 'Edit Special' for pads.
- Multi-activation allows the same jump orb to be activated multiple times. It is mainly for reusing moving orbs.
- There are no differences in functionality between orbs on the ground and in midair, as demonstrated in Deadlocked and many user levels.
- Before 2.11, the drop orb made the ship and UFO go downward regardless of gravity. It is a patched oversight.
- When either touches a dash orb, it will not show any glow, regardless of whether the player has the glow effect on.
- When the UFO or swing hits a drop orb, it has no terminal velocity until it lands on a surface or jumps again.
- When a player glides over an orb without activating it, it will show an expanding orb effect indicating its availability.
- The same orb may play the effect multiple times if a setup allows the orb to be passed multiple times, as seen on one of the orbs in the first cube sequence of Cycles.
- In older versions, 2 orbs show instead of 1. The reason the second orb effect was removed is unknown.
- While the official name of the black-coloured orb is the 'Drop Orb' as per the Event Trigger's Select Event menu, the community usually calls it the black orb based on its colour and prior orbs officially being referred to by colour.
- It is called a 'Drop Ring' in the game files.
- While the official name of the square recolourable orb is the 'Custom Orb' as per the Event Trigger's Select Event menu, the community usually calls it the toggle orb based on its default functionality being to toggle a group.
- By jumping onto the top left side of a block under a blue pad, it is possible to clip through the block and be launched at a wonky angle.
- Prior to Update 2.2, the old official name of orbs was rings. It was likely changed because most players called them orbs.
- The old name still appears in the help text that shows after dying twice at the start of Polargeist. ('Click while touching a ring to jump mid air')
- Teleporting with the spider pad or orb to a block scaled more than four blocks, with 'Extended collision' check enabled from the extras menu, the icon will ignore the block's hitbox. Without 'Extended collision', the icon sticks to the block's hitbox, 10 blocks from the centre. It also occurs on any platform or with hazards such as spikes or damage blocks.
Gallery
[edit | edit source]-
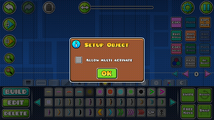 Orb setup menu (Pre 2.2)
 -
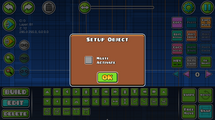 Orb setup menu (Post 2.2)
 -
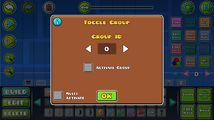 Toggle Orb edit menu (Pre 2.2)
 -
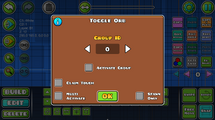 Toggle Orb edit menu (Post 2.2)
 -
 Setting indicators for orbs


